Using push notifications on the client side
There are just a few things the XMPP client application needs to receive the push notifications. Depending on whether you plan to use PubSub-full or PubSub-less configuration, some of the steps may be unnecessary.
Registering with a Push Service provider
First, the client application has to get a device-specific token from the Push Service Provider (FCM or APNs). This process is different, depending on the platform, so please consult your Push Service Provider's manual to see how to get this token. For example, here you can learn about setting up FCM on Android platform and here you can learn about setting up APNs on iOS platform.
After this step, your application shall be able to receive FCM or APNs token - it will be required in the next step of this tutorial.
Setting up an XMPP pubsub node
This step is specific to the PubSub-full push configuration that you chose for your MongooseIM server. If you're running a PubSub-less configuration, skip to this point.
Creating a new push node
In this example mypubsub.com is a domain of the MongooseIM server that has mod_pubsub_old enabled
with the push node support. The client sends the following stanza to the server:
1 2 3 4 5 6 7 8 9 10 11 12 13 14 15 16 17 18 19 20 | |
The pubsub.mypubsub.com will be used as a gateway for all notifications
and will pass them through to the APNs and/or FCM.
The most important and only difference from the standard node creation
is the type='push' part of the create element.
According to XEP-0357: Push Notifications, a PubSub node is
required to route the push notification mechanism. This implies you need a node that will handle
your push notifications, hence we create a node called punsub_node_for_my_private_iphone.
This node should be unique to the device and you may reuse nodes already created this way.
The token obtained from APNs or FCM is a good option to ensure this uniqueness,
by either using it directly or within some custom node name generation.
It is also important from the security perspective to configure the node with:
access_modelset towhitelistso only affiliated users can access the node.publish_modelset topublishersso only users withpublisherorpublisher_onlyrole can publish notifications.
Adding the server's JID to allowed publishers
Push notifications to the push node are addressed from your server's JID.
If the push node was configured with the above recommended options, you need to allow your server's
JID to publish notifications to that node.
Considering your JID is alice@mychat.com, your server's JID is just mychat.com.
The following stanza sent to the just created push node will allow your server JID to publish notifications:
1 2 3 4 5 6 7 8 9 10 | |
Enabling push notifications
The next and the last step is to enable push notifications on the server that handles your messages
(and has mod_event_pusher_push enabled).
Let's assume this server is available under the domain mychat.com.
To enable push notifications in the simplest configuration, just send the following stanza:
1 2 3 4 5 6 7 8 9 10 11 12 | |
We have now enabled push notifications to be sent to the pubsub.mypubsub.com domain
on the node punsub_node_for_my_private_iphone created previously, or in the case of PubSub-less,
for whatever unique node name we give here, for example any variation of the token obtained from
APNs or FCM. Please note that publish-options are specific to various XMPP Push Services.
Publish options
When using mod_push_service_mongoosepush, see the MongoosePush
request parameters
for the supported publish-options and how MongooseIM maps them to MongoosePush requests.
In particular, device_id and service publish options are mandatory.
Disabling push notifications
Disabling push notifications is very simple. Just send the following stanza to your XMPP chat server:
1 2 3 | |
You may skip the node='punsub_node_for_my_private_iphone' to globally disable push notifications
on all nodes that are registered with your JID.
This may be used to disable push notifications on all your devices.
Communication overview
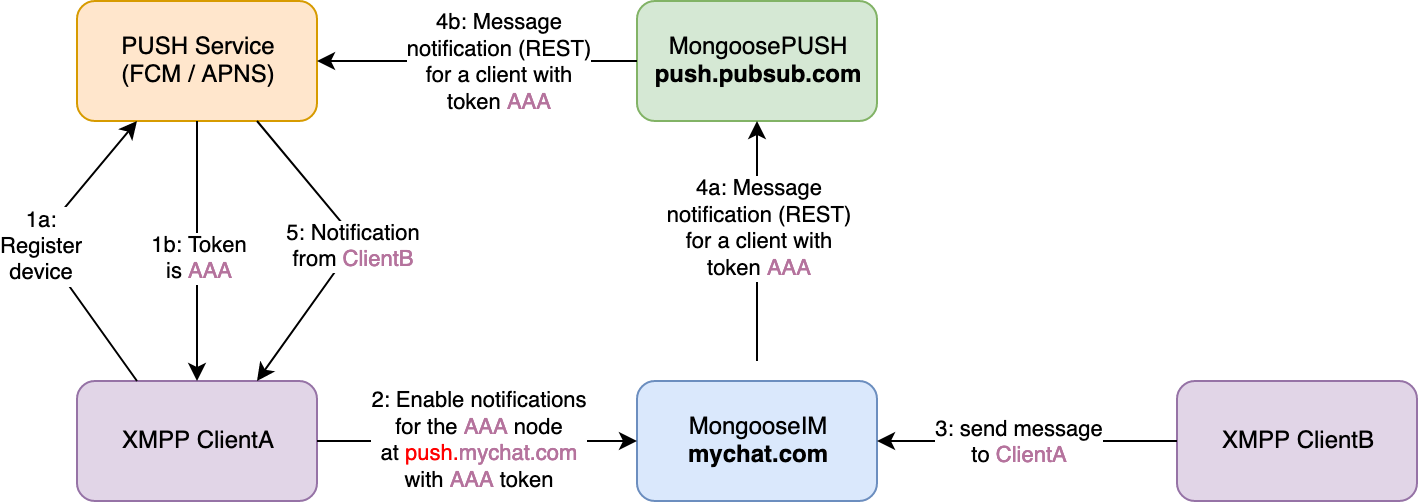
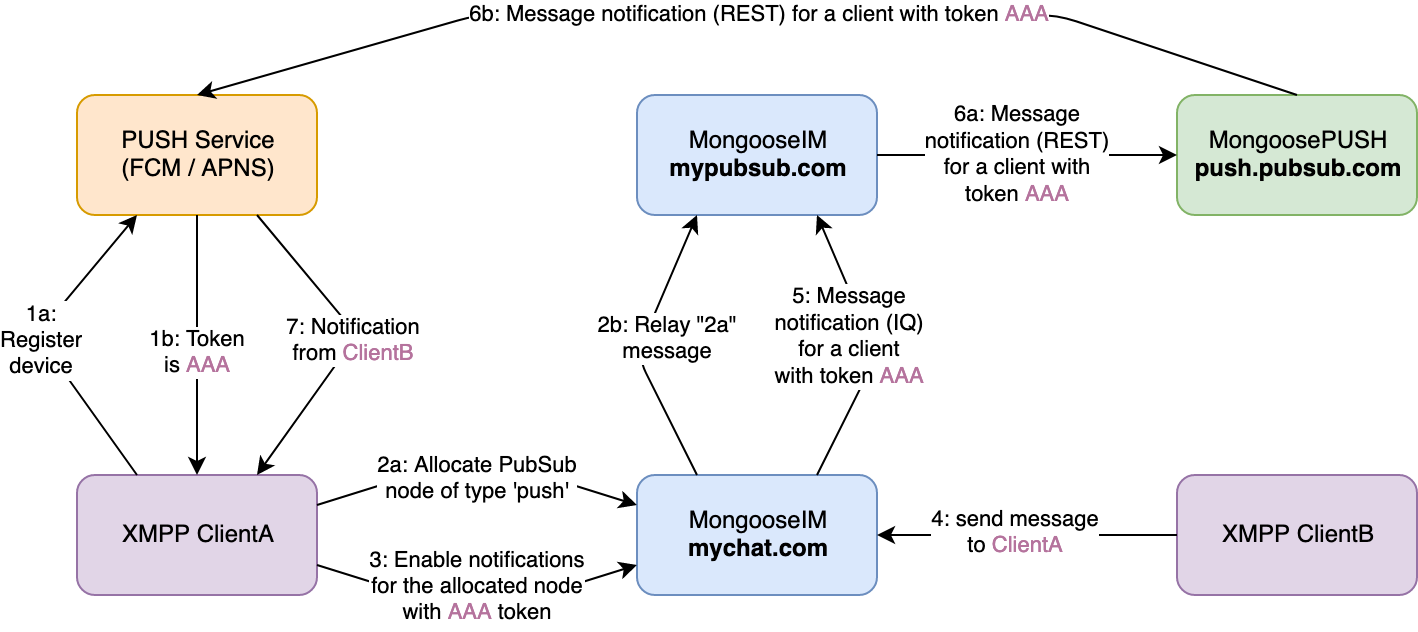
One picture is worth a thousand words, so here are two diagrams showing the typical communication when using push notifications:
PubSub-full
PubSub-less