How to set up Push Notifications with MongoosePush
MongooseIM server supports push notifications using FCM (Firebase Cloud Messaging) and APNS (Apple Push Notification Service) providers. Server side push notification support is fully compliant with XEP-0357 Push Notifications, which defines several components that need to work together in order to provide clients with working push notifications. The following list shows those components as defined in XEP-0357 and MongooseIM components that correspond to those entities:
- XMPP Server in MongooseIM is enabled by module mod_event_pusher_push
- App Server in MongooseIM is enabled by adding a
pushnode type to mod_pubsub's configuration - XMPP Push Service is implemented as a MongoosePush application
All these entities have to be enabled and properly configured in order to use push notifications. So let's get to it, shall we?
Overall component architecture
The components that make push notifications possible in MongooseIM add up to the following architecture:
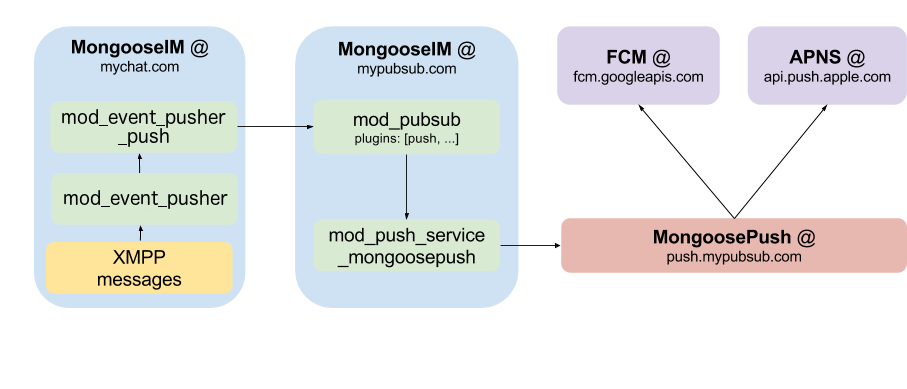
The diagram lists three domains in total - two for MongooseIM and one for MongoosePush. Note that this separation is not required, all three components can be on the same host with the same domain.
Configuring MongooseIM components
Firstly, let's configure all the required MongooseIM components, step by step.
mod_event_pusher_push a.k.a. 'XMPP Server'
The first component that we need to configure in MongooseIM is the mod_event_pusher_push module. This module communicates with XMPP clients directly in order to enable/disable notifications on per-client basis.
The mod_event_pusher_push module is very easy to enable - just paste the following to your MongooseIM configuration file:
{mod_event_pusher, [
  {backends, [
    {push, [{wpool, [{workers, 100}]}]}
  ]}
]}.
And that's basically it. You have just enabled the push notification support with 100 asynchronous workers that will handle all push notification related work.
You can also control the format of the "sender" of the push notification (which ultimately becomes the title of push
notification) and filter which messages will trigger the notification.
In that case you need to create a plugin module that implements the mod_event_pusher_push_plugin behaviour and enable this plugin
as specified in the mod_event_pusher_push documentation.
mod_pubsub with mod_push_service_mongoosepush a.k.a. 'App Server'
The next component to configure consist of two modules:
- mod_pubsub with a
pushnode type enabled that will act as a sink for push notifications generated by mod_event_pusher_push - mod_push_service_mongoosepush - a connector to MongoosePush application
mod_pubsub's push node
According to the XEP-0357 Push Notifications, all notifications generated via the module we have just enabled (i.e. mod_event_pusher_push) have to be send to a push enabled publish-subscribe node. In order to allow clients to allocate such a node, we need to enable it in our mod_pubsub on the MongooseIM server that will communicate with the XMPP Push Service.
The minimal mod_pubsub's configuration looks as follows:
{mod_pubsub, [
    {plugins, [<<"push">>]}}
]}.
Such configuration will enable the mod_pubsub with only one node type available: push.
Please note that if you want use mod_pubsub as a 'normal' publish-subscribe service, you just need to append the <<"push">> node type to the plugins list.
Also, it's important to note, that the first node type on the plugins list, will be the default one (allocated when the client does not provide a node type in the node create stanza).
mod_push_service_mongoosepush
This module acts as a bridge between mod_pubsub that receives notifications from mod_event_pusher_push and passes them to MongoosePush, which sends them to FCM and/or APNS. To enable this module type in your configuration:
{http_connections, [{mongoose_push_http,
    [{server, "https://localhost:8443"}]
}]}.

{mod_push_service_mongoosepush, [
    {pool_name, mongoose_push_http},
    {api_version, "v2"}
]}.
First, we create the HTTP pool for communicating with MongoosePush. Here, we assume that MongoosePush will be available on the localhost on port 8443 which is the default one. Next we enable mod_push_service_mongoosepush. First option is the name of the HTTP pool to use and the second one is the version of MongoosePush's API (currently only "v2" is supported).
And that's it, we've just completed the entire MongooseIM configuration. All we need to do now is to set up MongoosePush.
Starting MongoosePush
The easiest way to start MongoosePush is using its docker image.
But before you can set MongoosePush up, you need a FCM application token and/or an APNS application certificate.
You can get the FCM token here and the easiest way of getting an APNS application certificate is by running this script (please note that you need the certificate in pem format).
After you get the FCM application token and/or the APNS application certificate, you can prepare to start MongoosePush. Firstly, prepare the following files structure:
- priv/
- ssl/
- rest_cert.pem - The REST endpoint certificate
- rest_key.pem - private key for the REST endpoint certificate
- apns/
- prod_cert.pem - Production APNS app certificate
- prod_key.pem - Production APNS app certificate's private key
- dev_cert.pem - Development APNS app certificate
- dev_key.pem - Development APNS app certificate's private key
- ssl/
If your FCM app token is MY_FCM_SECRET_TOKEN and you have the priv directory with all ceriticates in the current directory, start MongoosePush with the following command:
docker run -v `pwd`/priv:/opt/app/priv \
  -e PUSH_FCM_APP_KEY="MY_FCM_SECRET_TOKEN" \
  -e PUSH_HTTPS_CERTFILE="/opt/app/priv/ssl/rest_cert.pem" \
  -e PUSH_HTTPS_KEYFILE="/opt/app/priv/ssl/rest_key.pem" \
  -it --rm mongooseim/mongoose-push:latest
If you don't want to use either APNS or FCM, you simply need to pass PUSH_APNS_ENABLED=0 or PUSH_FCM_ENABLED=0 respectively as additional env variables in your docker run command.
For more advanced options and configuration please refer to "Quick start / Configuring" in MongoosePush's README.md.
When your MongoosePush docker is up and running, Push Notifications can be used in your MongooseIM instance.
Using push notifications on client side
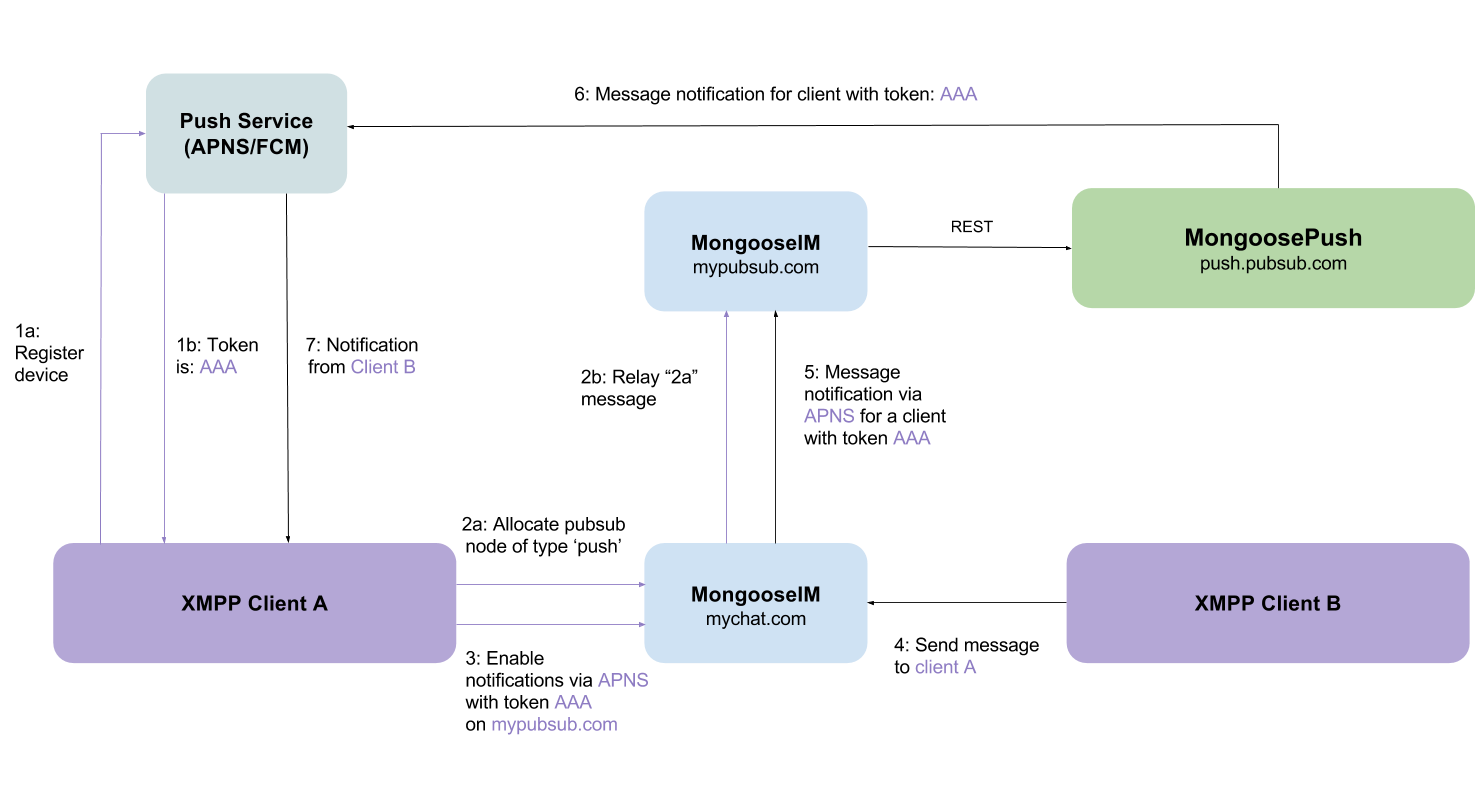
There are just a few things the XMPP client application needs to receive the push notifications.
See the diagram to examine the process described in this section along with the example notification flow:
Registering with a Push Service provider
Firstly, the client application has to get a device-specific token from the Push Service Provider (FCM or APNS). This process is different, depending on the platform, so please consult your Push Service Provider's manual to see how to get this token. For example, here you can learn about setting up FCM on Android platform and here you can learn about setting up APNS on iOS platform.
After this step, your application shall be able to receive FCM or APNS token - it will be required in the next step of this tutorial.
Setting up an XMPP pubsub node
Please note this first step is specific to the app-server your client application uses.
In case of MongooseIM, you just need to allocate (create) a special PubSub node that will act as a gateway for all notifications sent by the XMPP chat server.
Without any further ado, let's configure the PubSub's push node.
In this example mypubsub.com is a domain of the MongooseIM server that has mod_pubsub enabled with the push node support.
The client sends the following stanza to the server:
<iq type='set'
    to='pubsub.mypubsub.com'
    id='create1'>
  <pubsub xmlns='http://jabber.org/protocol/pubsub'>
    <create node='punsub_node_for_my_private_iphone' type='push'/>
  </pubsub>
</iq>
The pubsub.mypubsub.com will be used as a gateway for all notifications and will pass them through to the APNS and/or FCM.
The most important and only distinction from the standard node creation is the type='push' part of the create element.
This denotes that you need a node that will handle your push notifications.
Here we create a node called punsub_node_for_my_private_iphone.
This node should be unique to the device and you may reuse nodes already created this way.
After this step, you need to have the pubsub host (here pubsub.mypubsub.com) and the node name (here: punsub_node_for_my_private_iphone).
Enabling push notifications
The next and the last step is to enable push notifications on the server that handles your messages (and has mod_event_pusher_push enabled).
Let's assume this server**** is available under the mychat.com domain.
To enable push notifications in the simplest configuration, just send the following stanza:
<iq type='set' id='x43'>
  <enable xmlns='urn:xmpp:push:0' jid='pubsub.mypubsub.com' node='punsub_node_for_my_private_iphone'>
    <x xmlns='jabber:x:data' type='submit'>
      <field var='FORM_TYPE'><value>http://jabber.org/protocol/pubsub#publish-options</value></field>
      <field var='service'><value>apns</value></field>
      <field var='device_id'><value>your_pns_device_token</value></field>
      <field var='silent'><value>false</value></field>
      <field var='topic'><value>some_apns_topic</value></field>
    </x>
  </enable>
</iq>
We have now enabled push notifications to be send to the pubsub.mypubsub.com to the node punsub_node_for_my_private_iphone created in previous paragraph.
In publish-options we have passed the service name that we are using (apns or fcm) and the device token (here: your_pns_device_token) that you received from you push notification service provider (as described in Registering with Push Service provider).
Those two options are the only ones required, but there are some others that are optional:
mode- which may be eitherprodordev(default toprod). Decides which connection pool type on MongoosePush shall be used. This may be used when APNS on MongoosePush is configured to work with both production and development certificate.click_action- action to perform when notification is clicked on the device.activityon Android andcategoryon iOS. Please refer to your platform / push notification service provider for more info.topic- currently only used with APNS. the value is passed to APNS astopicheader. For more information please refer to APNS documentation.silent- if set totrue, all notifications will be "silent". This means that only data payload will be send to push notifications provider with no notification. The data payload will contain all notification fields as defined in XEP-0357.
Disabling push notifications
Disabling push notifications is very simple. Just send the following stanza to your XMPP chat server:
<iq type='set' id='x44'>
  <disable xmlns='urn:xmpp:push:0' jid='pubsub.mypubsub.com' node='punsub_node_for_my_private_iphone'/>
</iq>
You may skip the node='punsub_node_for_my_private_iphone' to globally disable push notifications on all nodes that are registered from your JID.
This may be used to disbale push notifications on all your devices.